YouTube is a video-sharing website on which users can upload, share, and view videos. Suppose that you have just created a YouTube channel and you are excited to upload an mov video on YouTube. However you will notice that the may take long to upload or YouTube may fail to recognize the file. In this case the file could be too long or its audio and video is encoded in other formats. If this happens you don't have to fret since this article aims to give you a solution to put (QuickTime) MOV video to YouTube for sharing with ease. 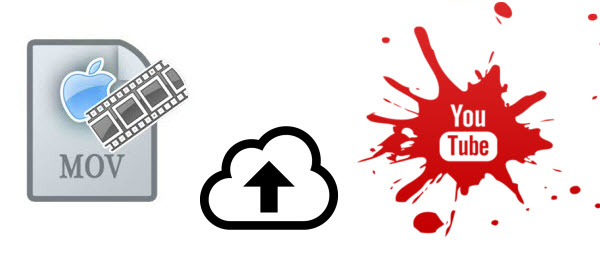 YouTube clearly announce MOV is one of YouTube supported video formats although, MOV is a container format. The video and audio streams stored in different MOV files may be encoded in different ways. YouTube just only recognizes the specific way that the audio and video streams of MOV files are encoded in. So, if your MOV files can't be accepted by YouTube, it may probably be the video & audio codec problem. To upload MOV to YouTube without any hassle, you'd better transcode QT MOV to YouTube most compatible format like .mp4, .flv, .avi, etc.. Dimo Video Converter Ultimate for Mac is an exceptional tool that allows you to convert videos and audios and upload them directly to YouTube. This video converter app can be used as a professional MOV to YouTube converter. With it, you can fast convert SD/HD/4K MOV videos to YouTube compatible format with a proper resolution like 720p( 1280×720), 1080p(1920×1080). It can also upload the media files to Vimeo and Facebook. The process is simple and quick. All you need to do sis to upload the file to the program, convert and upload it to the desired sharing sites. Besides MOV, it also supporting encoding MP4, MKV, XAVC, MTS, MXF, DivX, VOB, etc files for sharing on YouTube. Plus, with the built-in video editor, it's freely for you to trim the videos into multiple segments with shorter 15 min sections( YouTube has a 15 min limit in usual.). Moreover, it is Blu-ray/DVD toolkit, video editor, media server and a video player. a If you are Windows users, please get Dimo Video Converter Ultimate. Now I share the step-by-step guide to convert the (QuickTime) MOV file and upload it directly to YouTube. Free Download Dimo Video Converter Ultimate for Mac/Win:
 Other Download:
Guide: How to convert MOV to YouTube format Step 1. Import MOV files Lunch the MOV converter; drag & drop .mov files to it. Or click the "Add File" button to locate the files you want to add.
Other Download:
Guide: How to convert MOV to YouTube format Step 1. Import MOV files Lunch the MOV converter; drag & drop .mov files to it. Or click the "Add File" button to locate the files you want to add.  Step 2. Select output format This smart app directly offers users an optimized format for YouTube, and you just need to choose the "Select Format" category at the right side of the software window, then select Format > Web, and choose YouTube. Or choose MP4, FLV, AVI format from "Format > Video" or "Format > HD Video" which are all the proper formats. You can also press the Settings button to adjust the video size, bitrate, frame rate, audio sample rate, etc to optimize the quality. Step 3. Edit MOV for YouTube Click Edit button and you can trim, crop or adjust the video with the built-in video editor to get the very part and effect of the movie you want. And if the video clips you've trimmed are still longer than 15 minutes, you can turn to "Trim" to split the MOV video into smaller parts so as to share on YouTube without limit. Just click "Add Trim Maker" button, and set up the start time and end time of the video clip. After that, click OK at the right bottom.
  Step 4. Start the conversion Click "Start" button to start converting (QuickTime) MOV video for uploading to YouTube. After the conversion, click "Open" button to get the exported files and then upload the converted MOV files into YouTube for sharing with your friends, families, and fans. Step 5. Sign in and give a video description On the new window that emerges, sign in with your YouTube account. You can sign in with an existing account or you can choose to create a new one. Before uploading your video, you can write something about it (give a brief description). After describing your 4K video, click "Upload" button and your video will be successfully uploaded to YouTube, as you wanted. Besides sharing converted QT mov on YouTube, you can also watch them on TV or edit them in Premiere as you like. Free Download or Purchase Dimo Video Converter Ultimate for Mac/Win:
 Need the lifetime version to work on 2-4 Macs so that your friends and family can instantly broaden their entertainment options? Please refer to the family license here.
  Kindly Note: The price of Dimo Video Converter Ultimate for Mac is divided into 1 Year Subscription, Lifetime/Family/Business License: $43.95/Year; $45.95/lifetime license; $95.95/family license(2-4 Macs); $189.95/business pack(5-8 Macs). Get your needed one at purchase page. Related Software: BDmate (Mac/Win) Lossless backup Blu-ray to MKV with all audio and subtitle tracks; Rip Blu-ray to multi-track MP4; Convert Blu-ray to almost all popular video/audio formats and devices; Copy Blu-ray to ISO/M2TS; Share digitized Blu-ray wirelessly. DVDmate (Mac/Win) A professional DVD ripping and editing tool with strong ability to remove DVD protection, transcode DVD to any video and audio format, and edit DVD to create personal movie. Videomate (Mac/Win) An all-around video converter software program that enables you to convert various video and audio files to formats that are supported by most multimedia devices. 8K Player (Mac/Win) A mixture of free HD/4K video player, music player, Blu-ray/DVD player, video recorder and gif maker. Contact us or leave a message at Facebook if you have any issues. Related Articles:
Source: QT MOV to YouTube: Convert and Upload MOV to YouTube on Mac
Kindly Note: The price of Dimo Video Converter Ultimate for Mac is divided into 1 Year Subscription, Lifetime/Family/Business License: $43.95/Year; $45.95/lifetime license; $95.95/family license(2-4 Macs); $189.95/business pack(5-8 Macs). Get your needed one at purchase page. Related Software: BDmate (Mac/Win) Lossless backup Blu-ray to MKV with all audio and subtitle tracks; Rip Blu-ray to multi-track MP4; Convert Blu-ray to almost all popular video/audio formats and devices; Copy Blu-ray to ISO/M2TS; Share digitized Blu-ray wirelessly. DVDmate (Mac/Win) A professional DVD ripping and editing tool with strong ability to remove DVD protection, transcode DVD to any video and audio format, and edit DVD to create personal movie. Videomate (Mac/Win) An all-around video converter software program that enables you to convert various video and audio files to formats that are supported by most multimedia devices. 8K Player (Mac/Win) A mixture of free HD/4K video player, music player, Blu-ray/DVD player, video recorder and gif maker. Contact us or leave a message at Facebook if you have any issues. Related Articles:
Source: QT MOV to YouTube: Convert and Upload MOV to YouTube on Mac
With the introduction of Google Daydream, Google's VR division finally showed the world what Google's vision for VR is and perhaps where we can expect VR to go. Daydream introduces a 'VR mode' to the Android operating system and enables to get more sustained VR performance via their Android phone. A pairable remote you hold in your hand (similar to the Oculus Remote) controls the action. If you've some 3D Blu-rays that you would love to watch in Google DayDream View, you've come to the right place. In this article, you will learn how to rip 3D Blu-ray to DayDream View compatible 3D videos for watching via Android phone conveniently. 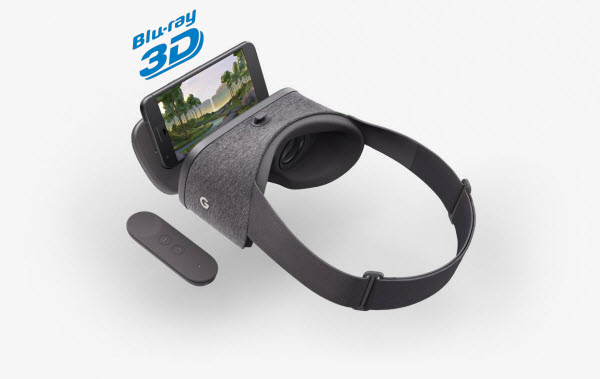 As far as we know, the DayDream View lacks ability to play 3D Blu-ray movies, and it requires either Side-by-Side MP4 video using a VR player. 3D Blu-ray in general acts on the principle of alternating frames for each eye, although there are several methods that can be used. For example, odd-numbered frames might be for the left eye whereas even-numbered frames are for the right eye. Side-by-side 3D means taking each frame, compressing them horizontally, and fitting them in a single frame. This results in the separate left-eye/right-eye 1920×1080 frames becoming two individual 960×1080 images inside the same frame. When you look at these, you can actually see the 3D composite if you use the "relaxed eyes" method. In this case, we will quickly walk you through how to rip a 3D Blu-ray to Side-by-side 3D file type which is friendly with DayDream View, so you can view 3D Blu-ray movies with Google DayDream View in 3D effects. To finish task, here we recommended you to try a 3D Blu-ray ripping program - Dimo Video Converter Ultimate. With it, you can legally remove copy protection from commercial 3D Blu-ray and effortlessly rip a frame packed movie from 3D Blu-ray disc and Blu-ray movie folder and output SBS 3D MP4 videos supported by Google DayDream with best quality easily. In addition, this 3D Blu-ray ripping tool also helps you to change 3D Blu-ray 3D MP4/MOV/MKV for many glasses or VR headsets on the market, like AirVR, VR One, Gear VR, Google Cardboard, HTC Vive, Oculus Rift, etc.. Besides 3D Blu-ray, 2D Blu-ray, DVD, 2D/3D videos to Daydream View conversion is allowed. If you're using a Mac, please turn to Dimo Video Converter Ultimate for Mac, which allows you to convert 3D Blu-ray to Google DayDream View on Mac (OS Sierra included). Now download the right version according to your situation and check out the steps below. Free Download Dimo Video Converter Ultimate: Other Download:
How to convert 3D Blu-ray to watch in Google DayDream View Step 1. Import 3D Blu-ray movie Launch the professional 3D Blu-ray to DayDream View converter. Click "Add Blu-ray" button to add 3D Blu-ray movie to it. Double click the video, you can preview the movie in the right side.
As far as we know, the DayDream View lacks ability to play 3D Blu-ray movies, and it requires either Side-by-Side MP4 video using a VR player. 3D Blu-ray in general acts on the principle of alternating frames for each eye, although there are several methods that can be used. For example, odd-numbered frames might be for the left eye whereas even-numbered frames are for the right eye. Side-by-side 3D means taking each frame, compressing them horizontally, and fitting them in a single frame. This results in the separate left-eye/right-eye 1920×1080 frames becoming two individual 960×1080 images inside the same frame. When you look at these, you can actually see the 3D composite if you use the "relaxed eyes" method. In this case, we will quickly walk you through how to rip a 3D Blu-ray to Side-by-side 3D file type which is friendly with DayDream View, so you can view 3D Blu-ray movies with Google DayDream View in 3D effects. To finish task, here we recommended you to try a 3D Blu-ray ripping program - Dimo Video Converter Ultimate. With it, you can legally remove copy protection from commercial 3D Blu-ray and effortlessly rip a frame packed movie from 3D Blu-ray disc and Blu-ray movie folder and output SBS 3D MP4 videos supported by Google DayDream with best quality easily. In addition, this 3D Blu-ray ripping tool also helps you to change 3D Blu-ray 3D MP4/MOV/MKV for many glasses or VR headsets on the market, like AirVR, VR One, Gear VR, Google Cardboard, HTC Vive, Oculus Rift, etc.. Besides 3D Blu-ray, 2D Blu-ray, DVD, 2D/3D videos to Daydream View conversion is allowed. If you're using a Mac, please turn to Dimo Video Converter Ultimate for Mac, which allows you to convert 3D Blu-ray to Google DayDream View on Mac (OS Sierra included). Now download the right version according to your situation and check out the steps below. Free Download Dimo Video Converter Ultimate: Other Download:
How to convert 3D Blu-ray to watch in Google DayDream View Step 1. Import 3D Blu-ray movie Launch the professional 3D Blu-ray to DayDream View converter. Click "Add Blu-ray" button to add 3D Blu-ray movie to it. Double click the video, you can preview the movie in the right side. 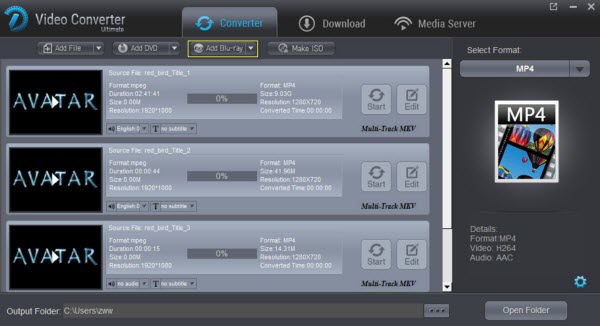 Step 2. Select an output format for DayDream View Click "Select Format" and find "Format > Video". there are a lot of format options for you. Here you can recommended to select MP4 as the output format. Tip: Click Settings to adjust the parameters like video codec, video bitrate, video frame rate, audio sample rate, audio channel. 1920x1080 compressed side-by-side 3D should be resampled to 1920x540 resolution full side-by-side resolution. And keep audio in AAC or MP3. Step 3. Set 3D mode Dimo 3D Blu-ray video Converter offers optimized 3D Blu-ray vdeo editing functions, empowering user to crop video file size, trim video segment, add special effect/watermark and so on to realize different needs.
 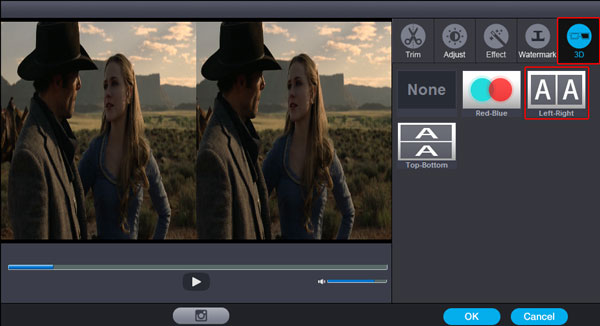 Step 4. Start to convert 3D Blu-ray to DayDream View Click "Start" button, 3D Blu-ray to Google DayDream View converter will start to work. Just be patient, it will not take you long time. After the conversion, click "Open" to get output SBS video for transferring to VR player to get better access. It is right time to play and enjoy your 3D Blu-ray on DayDream View anytime, anywhere for hours. To have a wonderful 3D home theatre experience, this conversion is just the first procedure. You need extra VR Player to view locally-saved 360 and VR videos onto DayDream View via Android as below: Installation First, you need to install the video player app, launch Play Store, then search for "Kolor Eyes" or browse to Kolor Eyes Play Store page. Once on the app page, click on the install button. Compatibility Any Android device running Android 4.x and later. Media compatibility Kolor Eyes is able to play any video that your device natively supports. Video format, resolution and bit rate depends on device model. Safe choice is h.264 encoded 1280x720 at 30 FPS (level 3.1). Most modern high-end devices play h.264 encoded 1920x1080 30 FPS video (level 4.1). Latest high-end models reach 4k resolution 3840x2160 at 30 FPS (level 5.1). A quick test to determine if a video is playable in Kolor Eyes is to try to play it with the native Videos app. Transport Local videos This screen exposes user movies downloaded using a URL (DOWNLOAD FILE menu. Downloading a file creates KolorEyes folder) or uploaded to the device directly. To upload a video locally, connect your device to your computer, then just upload your movies to the folder \Movies\KolorEyes\. If a video is greyed, Kolor Eyes is not able to play it. And the above top 3D video converter- Dimo Video Converter Ultimate is needed. Free Download or Purchase Dimo Video Converter Ultimate:
 Feel free to contact us if you have any issues. Related Articles:
Source: How to play 3D Blu-ray on Google DayDream View in Android
Feel free to contact us if you have any issues. Related Articles:
Source: How to play 3D Blu-ray on Google DayDream View in Android
The whole world is replaced with this new one, captured or download elsewhere and delivered for you to look around and enjoy. If you have recorded some 4K videos by camcorders or iPhone 7 or downloaded number of 4K movies of classical concerts and operas from YouTube/Netflix/Facebook, what if to rip audio from these 4K files and enjoy the soulful sooth sound on office stereo, save to iPod, iPhone or upload to YouTube, MySpace? Yes, this article is talking about this in right away- best solution to extract audio from 4K videos and movies as MP3, AAC, AC3, etc.. 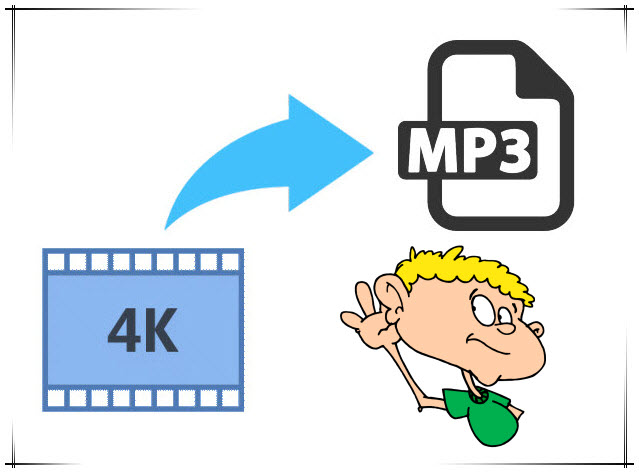 The tool you need to extract MP3 music from 4K UHD videos flawlessly It would be very easy to rip 4K video recordings or downloads to MP3 music with a 4K video to MP3 audio extractor. HereDimo Vido Converter Ultimate for Mac is highly recommended since it can finish 4K to audio conversion on Mac (OS Sierra) and save them as MP3, AAC, AC3, iPhone Ringtone, etc. in only a few clicks. It is quite easy to use. People only need to import source videos, set audio output format and then start the audio extraction work. Not only it is able to get audio content off 4K video, this 4K to MP3 converter could also extract audio content from SD/HD video files in various formats like MP4, MPEG, AVI, FLV, MOV, MKV, WMV, 3GP, etc. as MP3 format or other audio formats. Windows users could turn to Dimo Video Converter Ultimate to extract MP3 audio off 4K videos on Windows (10). Note: Newly updated HandBrake 1.0.0 now can read Ultra HD pass through, but need extra third-party audio extractor software, while there is no To MP3 Music option on it's GUI. Free Download Dimo Video Converter Ultimate for Mac/Win:
 Other Download:
Guide on how to Convert 4K Videos Movies to MP3 at One Go Step 1: Import source 4K video files Kick off Dimo Video Converter Ultimate for Mac to enter the main program interface, and click "Add file" button on the sub-menu to load your source 4K video files.
Other Download:
Guide on how to Convert 4K Videos Movies to MP3 at One Go Step 1: Import source 4K video files Kick off Dimo Video Converter Ultimate for Mac to enter the main program interface, and click "Add file" button on the sub-menu to load your source 4K video files.  Step 2: Set MP3 as output format Click the drop-down box of "Select Format". On the drop-down list, select "Format" option. Then select "MP3" from "Audio" column as output format. In addition to audio files, you can also downscale 4K to 1080p/720p videos for watching. Tips: a. If you need, you could click the "Settings" to adjust detailed audio parameters including audio codec, bit rate, channel and sample rate.
  b. You can also trim your MP3 to your wanted part to set as the ringtone. Click the "Edit" button; you will go into the "Video editor" interface. Click the "Trim" tab, select a "Start Point" and "End Point", and click "Add Trim Marker" to get your wanted part on the MP3. You can find the exact start time and end time in the "Start" and "End" boxes. After set the time, now don't remember click the "OK" to make confirm. Or you can trim multiple segments and even merge them together. See detailed steps here. Step 3: Convert 4K to MP3 Click the "Start" button and this 4K to MP3 extractor would start to convert 4K to MP3 immediately. After that, transferconverted MP3 or other audio files like AAC, AC3, iPhone M4R ringtone, etc. to let you enjoy on any audio player. More 4K to MP3 converters: There are a ton of professional 4K video converters for MacOS Sierra in the market to choose from, below we list two options. 1. 4K Video to MP3 [Free] 4K Video to MP3 extracts audio from any video. No annoying and complicated settings to deal with, just a clean, simple and functional interface. Add the video and get the MP3! Just click "Add Video" and choose a video file. Then close your eyes and enjoy high-quality MP3 audio! Cons: You cannot configure or change converted audio format/rate or others. 2. Wondershare Video Converter Ultimate This utility is a user-friendly software application aimed at allowing the user to convert, edit, enhance, download, burn, organize, capture, and watch in over 150 formats. It has an intuitive and friendly interface that makes it quite easy to use. Besides, it is pretty reliable and cost-effective. All in all, you will be impressed by such a smart video converter once you try it out. Cons: After you install this application, you have to be prepared to constantly receive update alerts or promotion of other products. Sometimes, uninstalling this video converter will fail. In this case, Dimo Video Converter Ultimate for Mac can be your best choice here. It is fully compatible with iMac, MacBook Pro, MacBook, MacBook Pro, MacBook Air running Mac OS X 10.6 and above (macOS, Sierra, Mac OS X El Capitan, Yosemite, Mavericks and Mountain Lion included). Free Download or Purchase Dimo Video Converter Ultimate for Mac: Contact us or leave a message at Facebook if you have any issues. Related Articles:
Source: The efficient method to convert 4K to MP3 on macOS Sierra
b. You can also trim your MP3 to your wanted part to set as the ringtone. Click the "Edit" button; you will go into the "Video editor" interface. Click the "Trim" tab, select a "Start Point" and "End Point", and click "Add Trim Marker" to get your wanted part on the MP3. You can find the exact start time and end time in the "Start" and "End" boxes. After set the time, now don't remember click the "OK" to make confirm. Or you can trim multiple segments and even merge them together. See detailed steps here. Step 3: Convert 4K to MP3 Click the "Start" button and this 4K to MP3 extractor would start to convert 4K to MP3 immediately. After that, transferconverted MP3 or other audio files like AAC, AC3, iPhone M4R ringtone, etc. to let you enjoy on any audio player. More 4K to MP3 converters: There are a ton of professional 4K video converters for MacOS Sierra in the market to choose from, below we list two options. 1. 4K Video to MP3 [Free] 4K Video to MP3 extracts audio from any video. No annoying and complicated settings to deal with, just a clean, simple and functional interface. Add the video and get the MP3! Just click "Add Video" and choose a video file. Then close your eyes and enjoy high-quality MP3 audio! Cons: You cannot configure or change converted audio format/rate or others. 2. Wondershare Video Converter Ultimate This utility is a user-friendly software application aimed at allowing the user to convert, edit, enhance, download, burn, organize, capture, and watch in over 150 formats. It has an intuitive and friendly interface that makes it quite easy to use. Besides, it is pretty reliable and cost-effective. All in all, you will be impressed by such a smart video converter once you try it out. Cons: After you install this application, you have to be prepared to constantly receive update alerts or promotion of other products. Sometimes, uninstalling this video converter will fail. In this case, Dimo Video Converter Ultimate for Mac can be your best choice here. It is fully compatible with iMac, MacBook Pro, MacBook, MacBook Pro, MacBook Air running Mac OS X 10.6 and above (macOS, Sierra, Mac OS X El Capitan, Yosemite, Mavericks and Mountain Lion included). Free Download or Purchase Dimo Video Converter Ultimate for Mac: Contact us or leave a message at Facebook if you have any issues. Related Articles:
Source: The efficient method to convert 4K to MP3 on macOS Sierra
Blu-rays are trapped on physical platters. If you want to watch something, you have to find the disc, slide it into a Blu-ray player—or a computer with a Blu-ray drive—and flip your TV to the proper input. However, once you convert your Blu-ray movie library to digital files for storage in personal cloud online, you can make Blu-ray available through the network disk, Dropbox, Seagate personal cloud media storage, etc., and share it with your family members or access your Blu-ray movies at home or on the road. This article will focus on how to process Blu-ray to personal cloud conversion for backup and watching conveniently. 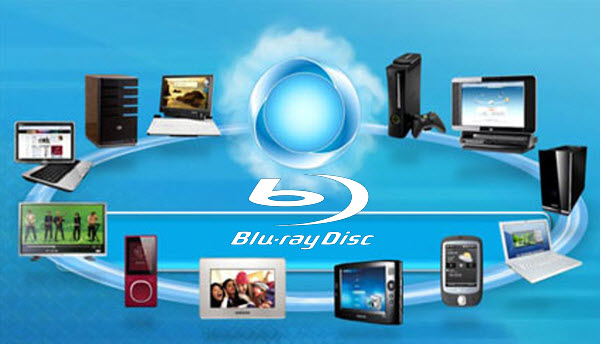 With a fast and easy-to-use Blu-ray to cloud ripper, you will save your time and effort in establishing a complete and convenient online personal movie theater. Here Dimo Video Converter Ultimate for Mac is highly recommend which fully supports digitizing your Blu-rays to personal cloud compatible file type beforehand. Overall, it is the best Blu-ray ripping program that helps you effortlessly finish the Blu-ray conversion on Mac (OS Sierra supported) bypassing Blu-ray copy protection. With it, you can convert Blu-ray to almost all regular video formats for personal cloud like MP4, MOV, MKV, FLV, WMV, AVI, etc. and even extract MP3, WMA, FLAC, OGG, etc. audio from Blu-ray movies. Best of all, it allows you to copy your Blu-ray to hard drive in lossless mkv with keeping original structure or backup Blu-ray to ISO image file. If you are a Windows user, pls turn to Dimo Video Converter Ultimate. Now, download the software on computer and follow the guide below to start conversion. Free Download Dimo Video Converter Ultimate for Mac/Win: Other Download:
Guide: Ripping Blu-ray for copying to Personal Cloud 1. Insert Blu-ray disc to the drive, then launch the Blu-ray to cloud Converter and click the "Add Blu-ray" button to have the Blu-ray content imported. You can also add BDMV folder for converting.
With a fast and easy-to-use Blu-ray to cloud ripper, you will save your time and effort in establishing a complete and convenient online personal movie theater. Here Dimo Video Converter Ultimate for Mac is highly recommend which fully supports digitizing your Blu-rays to personal cloud compatible file type beforehand. Overall, it is the best Blu-ray ripping program that helps you effortlessly finish the Blu-ray conversion on Mac (OS Sierra supported) bypassing Blu-ray copy protection. With it, you can convert Blu-ray to almost all regular video formats for personal cloud like MP4, MOV, MKV, FLV, WMV, AVI, etc. and even extract MP3, WMA, FLAC, OGG, etc. audio from Blu-ray movies. Best of all, it allows you to copy your Blu-ray to hard drive in lossless mkv with keeping original structure or backup Blu-ray to ISO image file. If you are a Windows user, pls turn to Dimo Video Converter Ultimate. Now, download the software on computer and follow the guide below to start conversion. Free Download Dimo Video Converter Ultimate for Mac/Win: Other Download:
Guide: Ripping Blu-ray for copying to Personal Cloud 1. Insert Blu-ray disc to the drive, then launch the Blu-ray to cloud Converter and click the "Add Blu-ray" button to have the Blu-ray content imported. You can also add BDMV folder for converting. 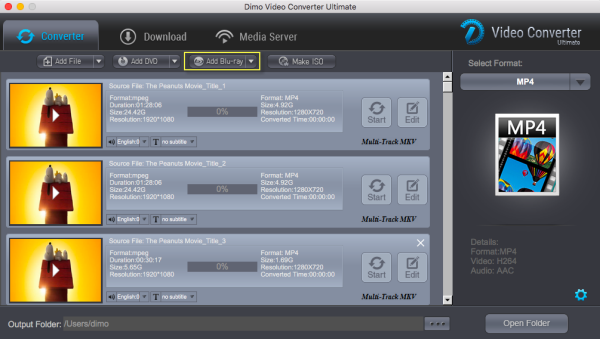 2. Click "Select Format" bar and choose a compatible format for Personal Cloud. MP4, MKV, MOV from "Format > Video" are the proper choice. Tip: With the right settings you can retain the quality of the original Blu-ray while also saving space. This is particularly helpful when streaming over your network, depending on your network quality. Simply click Settings bar and you can tweak the settings to your satisfaction and even save it as preset.
 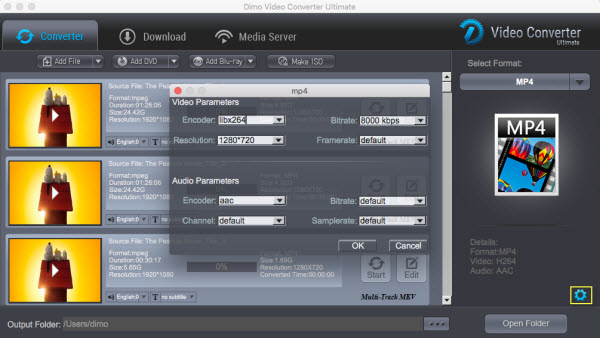 3. Hit the "Start" button at the bottom of the main interface to start ripping Blu-ray movie to digital file accepted by your cloud storage device. How to Put the Converted Blu-ray Videos to Cloud Storage Device? Once being converted to digital files, your movie library can be stored/uploaded onto a server and streamed later for different uses. You can play the files directly online (but the Network speed is a deciding factor), and download them to local disks. Outstandingly, cloud service makes movies, music and photos more portable. Only if you have an online account, you can use the movies on your home PC, work PC and portable PC, stream it to an app, Chromecast, Smart TV, Roku player or a set-top box. Now you are able to view Blu-ray on iPhone, iPad, WDTV, PS4, Xbox One, Roku, etc. with the help of personal cloud. Free Download or Purchase Dimo Video Converter Ultimate for Mac/Win: Need the lifetime version to work on 2-4 Macs so that your friends and family can instantly broaden their entertainment options? Please refer to the family license here. Kindly Note: The price of Dimo Video Converter Ultimate for Mac is divided into 1 Year Subscription, Lifetime/Family/Business License: $43.95/Year; $45.95/lifetime license; $95.95/family license(2-4 Macs); $189.95/business pack(5-8 Macs). Get your needed one at purchase page. Contact us or leave a message at Facebook if you have any issues. Related Articles:
Source: Copy Blu-ray movies to Personal Cloud
3. Hit the "Start" button at the bottom of the main interface to start ripping Blu-ray movie to digital file accepted by your cloud storage device. How to Put the Converted Blu-ray Videos to Cloud Storage Device? Once being converted to digital files, your movie library can be stored/uploaded onto a server and streamed later for different uses. You can play the files directly online (but the Network speed is a deciding factor), and download them to local disks. Outstandingly, cloud service makes movies, music and photos more portable. Only if you have an online account, you can use the movies on your home PC, work PC and portable PC, stream it to an app, Chromecast, Smart TV, Roku player or a set-top box. Now you are able to view Blu-ray on iPhone, iPad, WDTV, PS4, Xbox One, Roku, etc. with the help of personal cloud. Free Download or Purchase Dimo Video Converter Ultimate for Mac/Win: Need the lifetime version to work on 2-4 Macs so that your friends and family can instantly broaden their entertainment options? Please refer to the family license here. Kindly Note: The price of Dimo Video Converter Ultimate for Mac is divided into 1 Year Subscription, Lifetime/Family/Business License: $43.95/Year; $45.95/lifetime license; $95.95/family license(2-4 Macs); $189.95/business pack(5-8 Macs). Get your needed one at purchase page. Contact us or leave a message at Facebook if you have any issues. Related Articles:
Source: Copy Blu-ray movies to Personal Cloud